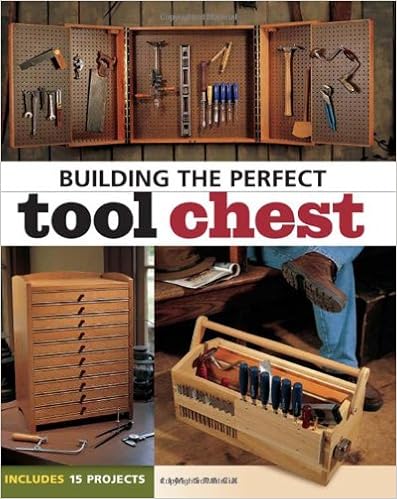
By Jim Stack
Construct the instrument chest of your goals!
Why pay money for prepackaged instrument containers if you could make anything greater from scratch - a device field adapted in your particular wishes?
In development the ideal instrument Chest, grasp craftsman Jim Stack presents entire fabrics lists, plans and step by step directions for development 15 trendy, but sensible, designs.
Perfect for hand instruments and tool instruments alike, initiatives variety from dependent rolling cupboards to utilitarian tote containers - a range that guarantees anything for each woodworker, it doesn't matter what your point of ability. It's all of the information you must craft the device chest layout you've been dreaming of - vintage, modern or uniquely your individual!
Projects comprise:
Handy field Small device chest device caddy Ten-drawer chest Jim's toolbox Rolling device cupboard Cabinetmaker's chest Journeyman's tote field Sliding-door cupboard airplane cupboard & case Pegboard-lover's cupboard Fly-tying field Southwestern chest Curved-front chest 21st-century instrument cupboard
Read or Download Building the Perfect Tool Chest PDF
Similar woodworking books

The Southwestern element of this enjoyable development publication contains a gecko welcome peg rack, adobe bookends, cactus shelf, coyote swap plate hide, and extra.
Discovering a chippie who does caliber work—at an inexpensive fee and in a well timed fashion—can be a true problem. For little jobs you could spend extra time trying to find a chippie than you'll doing the activity your self, in case you in basic terms had a few easy instruments and carpentry abilities. through the years, the power to deal with small carpentry jobs can prevent loads of cash.
* * INSCRIBED AND SIGNED by way of the writer ON name web page * * delicate disguise with plastic comb binding, illustrated with b/w photographs and drawings, a hundred pages. third revision. disguise has gentle put on to edges - more often than not to suggestions of corners and calmly dirty. textual content is unmarked. pictures to be had. USPS affirmation used on all U.
- The Perfect Edge: The Ultimate Guide to Sharpening for Woodworkers
- Easy to Build Birdhouses - A Natural Approach: Must Know Info to Attract and Keep the Birds You Want (Popular Woodworking)
- Wood Finishing 101: The Step-by-Step Guide
- The Art of Woodworking Master woodworker
- Popular Woodworking Pocket Shop Reference
Additional resources for Building the Perfect Tool Chest
Example text
After the chest is finished (inside and out), the drawers should work perfectly. Apply some paste wax to the glides and the drawer sides if you want. 52 70598 I project 07 044-053 new 9/4/08 8:19 PM Page 53 step 14 • Cut 45° miters on the ends of the top’s rails and assemble 3 step 15 • Square the inside corners of the rabbet and attach the con- the lid H. Cut a stopped rabbet ⁄ 32" deep by 3⁄ 4" wide by 24" long in the top edge of the tool chest’s back E. Cut a matching rabbet in the lid H’s bottom back rail.
Cabinetmaker’s This tool chest is a classic design. chest 45 70598 I project 07 044-053 new 9/4/08 8:19 PM Page 46 3/16" lip typ. on all drawer fronts. Raised panel detail 1" 1/8" 19° 5/16" 3/16" This is the angle as it is read on the table saw blade tilt gauge. Typical drawer construction 1/8" x 1" dowels Backs have no side groove, just rabbet for bottom. drawer side 3/8" 1/8" 3/8" 1" on center CL 3 /8" Flipper lid detail on center 3/4" 11/4" 1/2" Drill this hole 11/4"- deep. 1/4 " drawer glide X Locate side hole in the center of the door.
Step 4 • Add glue to the end of the other rail and put it in place. step 5 • Put glue on the ends of both rails and put the other stile in place. 49 70598 I project 07 044-053 new S T E P - B Y- S T E P 9/4/08 8:19 PM Page 50 construction step 1 • Use a ripping blade to cut the bevels on the panels for ends A, back E, flipper door G and lid H. These are cut at 19°. Standard bevels are usually 5° to 9°. I wanted a narrower setoff on the raised part of the panel, so I increased the angle. ) step 3 • Glue the hardwood edging on the front edge of the bottom B.