By K. Winchester
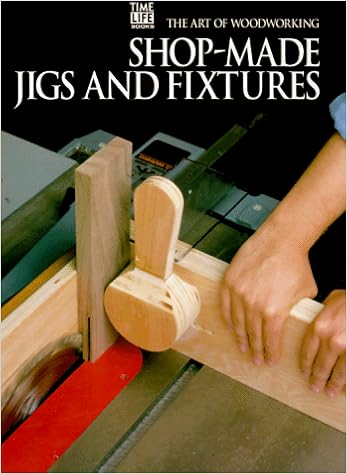
;Art of Woodworking - Shop-Made Jigs And furnishings КНИГИ ; ХОББИ и РЕМЕСЛА Автор: ok. Winchester Название: Shop-Made Jigs And furniture Издательство: Time-Life Books Год: 2005 Формат: djvuРазмер: 5,2 Мб Для сайта: www.mirknig.comКниги из серии The paintings Of Woodworking являются энциклопедией столярного дела.В них можно найти все, что связано со столярными работами.Разобраться можно и без знания английского языка, книги богато иллюстрированы.Shop-Made Jigs And furniture - цветное иллюстрированное специализированное пособие по изготовлению крепежных приспособлений для столярных работ. .comuploading.com eighty five 1 2 three four five
Read or Download Art of Woodworking - Shop-Made Jigs And Fixtures PDF
Similar woodworking books

The Southwestern element of this enjoyable development publication encompasses a gecko welcome peg rack, adobe bookends, cactus shelf, coyote change plate disguise, and extra.

Discovering a wood worker who does caliber work—at an affordable rate and in a well timed fashion—can be a true problem. For little jobs you could spend extra time trying to find a wood worker than you'll doing the activity your self, if you happen to basically had a few simple instruments and carpentry talents. through the years, the power to address small carpentry jobs can prevent loads of cash.
* * INSCRIBED AND SIGNED by means of the writer ON identify web page * * gentle hide with plastic comb binding, illustrated with b/w photographs and drawings, a hundred pages. third revision. hide has mild put on to edges - in general to counsel of corners and calmly dirty. textual content is unmarked. pictures to be had. USPS affirmation used on all U.
- In the Craftsman Style - Fine Woodworking
- The Art of Woodworking Tables and desks
- Making Clocks
- Art Of Woodworking - Finish Carpentry
- Advanced Scroll Saw Clocks: Measured Drawings for Five Antique Samples
- Build Your Own Home Office Furniture (Popular Woodworking)
Extra resources for Art of Woodworking - Shop-Made Jigs And Fixtures
Sample text
Rip these two parts to size. sides and cut thickness of the a groove into the back side of the face-frame stiles 1⁄4-in. deep and with its outer edge 1⁄4-in. from each side, as shown in Photo B . 3. Attach a sacrificial face to your rip fence, s t r a t e g i e s F e g 7. Measure the groove-to-groove distance on the face-frame, and add 1⁄ 2 in. to determine the length of the top and bottom. I find that a rigid rule gives a more accurate reading than a tape measure, so I use it when the scale of the project permits, as shown in Photo g.
In actual practice, though, it’s much safer to buy all the molding you need for your project at one time from the same supplier. 30 m a T e r i a l s 2. Cut the profile strip free from the board on your tablesaw. If possible, position the profile outside of the blade so it falls away from the blade as shown in Photo B. A strip caught between the blade and fence represents a kickback hazard. removingandreusingmoldings The demolition phase of a project isn’t simply about applying brute force.
Cut both the right and left halves of the joint, and then test-fit the pair, as shown in Photo B . If you’re painting the molding, you can hide an imperfect joint with putty, but clear finishes require more care and finesse. 32 m a t e r i a l s the miter joint and nail the pieces in place, as shown in Photo C . For more information on fastening tools and techniques, see p. 124 and the sidebar “Tougher Than (Ordinary) Nails” on p. 35. Learning to cope 1. One half of a cope cut is very easy— simply butt one length of molding into a corner.